Mending an Embellishing
- SewCreative

- Apr 24, 2020
- 3 min read
Updated: Apr 25, 2020

Mending and Upcycling
As our last post for Fashion Revolution week, we are looking at how to make do and mend. We want to encourage you to mend, and therefore keep, the clothes that you already have. Below we have two different mending techniques for you, as well as some embellishment ideas to give your wardrobe a new lease of life.
Visible Mending
There has been a huge trend in recent years for visible mending. The idea is that you make a feature of your mends, rather than trying to hide them. Sashiko mending comes from Japan and its ethos is to decorate clothing and homeware items with geometric patterns, in contrasting thread, as a way to mend worn out items.


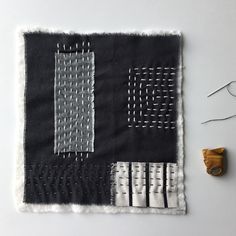


This technique works best with heavy woven fabrics such as canvas and denim. For the sample, I have mended a hole in some stiff denim using this technique. Start with your hole, and then neaten it into a square. Add a patch of fabric, of a similar weight, to the back of the hole and pin or tack it into place. You can interface this patch if needs be. Choose a design for your mending stitch. There are hundreds of examples online, but we chose a simple stripe pattern.


The key to sashimi mending is neat, even stitches in a strong thread. We used embroidery floss, but mending well would work well too. Draw your design onto the fabric and then start stitching. Make sure that you are catching the edges of both fabrics in your stitching. Once you have completed your design, secure any loose parts down with a matching thread.
Darning
If visible mending isn’t your thing, then maybe try darning. This is a mending technique that people have been using for generations, and is designed to fix holes in knit garments such as socks, tshirts and vests. In order to darn a hole, you need a smooth surface to sew against. A darning mushroom or egg works best, but the bottom of a bowl can work too. Just just need to stretch the hole out enough that you can see the loops of the knit fabric. Thread a needle with a single strand of strong thread in a matching colour. Pick up a loop on the top of the hole and travel the needle across the hole. Pick up a loop on the opposite side and repeat until you have formed a ‘ladder’ across the hole. Pull tightly in your thread and watch the hole disapprear. The tinier the stitches you do, the more invisible your mend will be.


Embellishment
Jazzing up a garment you already own is a great way to make it feel new and interesting. Adding some embroidery to a plain garment can intrudeuce colour and charm to your outfit.


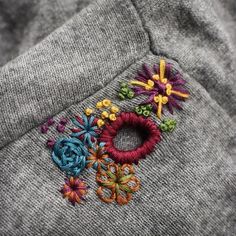


Below, we’ve added folk floral embroidery to the waistband our a Mayfair dress. It takes a simple garment up a level. To do this, you will need to draw your design onto your fabric with chalk and then use 6-strand embroidery floss to add your design. There are lots of inspiration and how-to ideas online to get you started with hand embroidery.

Using heat transfer vinyl is a great way to add your own personality to your wardrobe. You can buy this online from retailers such as happyfabric.co.uk and it can be cut either by hand or with a cutting machine. Below are two examples of garment up cycled with heat transfer vinyl. The first is a plain t-shirt, where we hand cut the letters out in black vinyl and used printer transfer paper to print the design, which were then ironed on. The other option, if you have one, is to use a machine like a Cricut, which cuts out small and intricate shapes for you. Here we have used our Cricut to cut out spots and stars, which will be used to add detail to a t-shirt neckline.


Other options for embellishment, which are less technical, are patches and beads. Iron on patches are available from lots of places online (we’ve put some of our faves below) and can show your allegiance to every cause, from craft to politics, there's a patch for everyone. Try a single patch on a t-shirt or group them on a skirt to show off your collection.


You can add beads and sequins to necklines to dress up a simple garment. How about recycling some old costume jewellery, you could sew the pieces of the jewellery onto a top for the jewel encrusted look? Jewellery parts usually have handy holes on them already making them easy to sew!


Get upcycling this weekend and share your makes @youre.sew.creative
Keep safe and happy sewing, the Sew Creative team x


Comments