GBSB Season 6: Episode 5 - Making Undies!
- SewCreative

- May 21, 2020
- 5 min read
This week we're doing our Sewing Bee blogs a little differently. As it's sleepwear and underwear week, we thought that we would show you two different makes, ideal for confident beginners, that will have you whipping up your own undies in no time! Today, Alex is going to show you how to make the Barrett Bralette by Madalynne. This is a free pattern, that you can download here, and can be made in any fabric with at least 50% stretch, so that's all of the jerseys, stretch laces and mesh that you can dream of! Come back later in the week for Kate's pattern-free kimono, the perfect luxe robe.
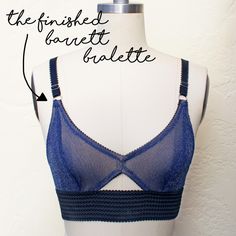


Madalynne's Barrett bralette is a multi-sized free pattern, available on her website. It features adjustable straps, a cute front cutout and supportive bottom band. There are loads of hacks for this online, so you can modify to your heart's content. Make it as a bikini with Lycra, a cute triangle bra in lace or a super comfy lounge bra in a soft cotton jersey.
Materials:
Jersey - any knit fabric with at least 50% stretch. This could be T-shirt jersey, stretch lace or stretch mesh.
Power Mesh - this is a super stretchy mesh that is used for lining underwear and swimwear.
Lingerie or foldover elastic - make sure that it is soft enough to have next to your skin. It will also need to be the same width as the lingerie notions that you choose. You can buy pretty picot elastic for the edges or shiny satin elastic for the straps.
Band elastic - this can either be standard wide elastic or a fancier specialty elastic. You could also use a sturdy lace trim with stretch.
Lingerie notions (rings and sliders) - these are optional, if you choose to measure your strap length you can skip this bit.
Stretch needle - this is important when sewing fiddly, slippery fabrics
Step One: Cutting out
Following the pattern instructions, cut out two of each pattern piece, one in your main fabric and one in your lining fabric.


Step Two: Assembling the front
The way that this bra is lined is really clever. You sew it in such a way that all of the raw edges are fully enclosed between the outer and lining. Firstly sew the the centre front seam on both main and lining pieces. Press these seams open using a low heat on the iron, then tack these together at centre front by stitching in the ditch.


In order to enclose the over bust seams, sandwich the assembled front between the side front pieces, right sides together, so that all 4 raw edges line up. If you would find it easier, you can baste the centre front panels together before adding the side front.


Once, sewn, trim down the seam to ¼ inch (5mm) to reduce bulk. Open out the side front pieces so that the bra lies flat. You will now see that all of the seams are enclosed.
Step Three: Adding the back
We are going to use the same method to add the back band, but as you are enclosing both side seams at the same time, it can look a little funny. Also bear in mind that the back is shorter than the front to allow for a close fit to your body. Place the back band pieces (out and lining) right sides together with the front, matching all 4 raw edges again and sew. You will now need to bring the outer piece over the front and the lining piece round the back to match up the raw edges on the other side seam.

You can now turn your bralette right sides out.
Step Four: Adding trim elastic
The instructions in the pattern explain this step better than I ever could, but I do have some tips for you. If using foldover elastic at this stage, stitch down the inside first, then fold over the raw edge and stitch down the remaining loose edge to hide your first line of stitching. Madalynne gives great instructions if you're using pretty picot, and the same instructions will go for using standard narrow elastic. I used our sparkly foldover elastic and whilst it is beautiful, it is also a little scratchy, so I have to get creative with my elastic application and sew it on the outside, rather than the inside.


Step Five: Adding straps
If you are using lingerie rings and sliders to make the straps adjustable, the first attempt at sewing them can be a little tricky. Follow the pattern instructions and it will all turn out ok, even if it seems strange whilst you're sewing it. First, sew a short length of elastic, with the ring on the front of your bra (or the back, it's up to you). Then sew a longer piece of elastic round the middle bar of the slider. Take the other end of the slider elastic and thread it through the ring, then bring this back up and over the middle bar. Secure this loose end in place on the back (or front) and you will have a functioning adjustable bra strap.


If you can't get these notions, or if you just don't fancy using them, you can try the bralette on and estimate how long the elastic for the straps needs to be. If you're doing this though, it would recommend waiting to secure the back of the straps until the rest of the bralette is finished, so you can get a try idea of how it will fit you.
Step Six: Adding the band
The last stage is to add the bottom band, this is what will hug the bra close to you and give you support. I chose to use the same fabric as my bra and created a band from this. In order to make it fit snugly, I made the band shorter than the bra, so that it will pull in close when I wear it. If you need more support, you can always add some wide elastic into this channel. The other option is to use wide elastic and topstitch it on as per the instructions. You can buy some really pretty wide elastics online so get creative.
Below are the photos of the finished article and I've got to say, I love it! This bralette is my saviour during lockdown, as its comfy and just supportive enough. If you need more support for day to day wear, Madalynne has lots of fabulous patterns available. I think this would make a great lounge or sleep bra for the well-endowed lady!

Fabric Suggestions:
We sell nude coloured power mesh which can be found here.


L-R: Lady McElroy Terracotta Moon Gemstones; Eggshell Stripe Cotton Jersey; Snow Leopard Cotton Jersey; TATB Love Your Nails Cotton Jersey; Pewter Dotty Cotton Jersey; Lady McElroy Savannah Crepe Jersey
Keep safe and Happy Sewing, the Sew Creative team xx


Comments