6 Hacks For Your Indigo - Including Button Back!
- SewCreative

- Apr 29, 2020
- 7 min read
We all know how much we love the Tilly and the Buttons Indigo pattern here at Sew Creative. We've made them for all occasions and think that this dress is the ultimate in secret pyjamas. After making enough Indigo's to fill a whole wardrobe, we've managed come up with some pretty good ways to hack this pattern to change up the way it looks.
The photo on the pattern envelope doesn't do this pattern much justice, so we thought that we would show you all of the wonderful ways to make Indigo. If you've already bought one of our kits, use up some stash fabric and give this a go. If you don't yet have the pattern, then now's the time to grab it from us here and get going. We promise you that you'll love this one!
Changing the length

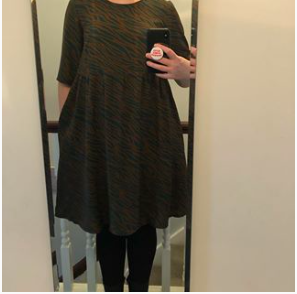
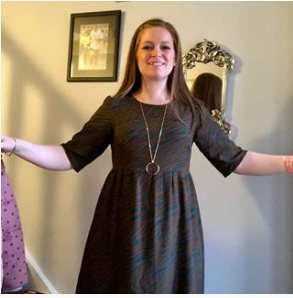
The easiest way to change up this pattern is to change the length. whilst we love the hip-length version in the pattern, its not always flattering. You can change this up by folding the pattern pieces for the skirt to the desired length, or adding to the length at the hem. To find this out, measure from your under bust to where you want the hem to finish, add 1 inch and fold your pattern to this length. Then just sew up the top like normal.
The result is a floaty, summery top perfect for wearing with jeans, just like mine above. You could also shorten the dress is knee length isn't your style. Here Kate has taken 6 inches off the hem for a flirty, flattering number. She's also shortened her sleeves by folding the excess pattern out of the way when cutting out and added a ruffle tier to the skirt hemline.

If you love the tiered look, then Indigo is a great pattern to have a go at this with. To add tiers to your top or dress, cut the pattern in the envelope, but shorten it by the length of the tiered ruffle you want to add. For example, if I want my overall top to be 30cm from under bust to hem, then I will measure to 15cm on the original pattern, and cut here. I will then cut a separate rectangle of fabric the same width as the original pattern piece x 15cm length.
If you would like a ruffled tier; to work out how much fabric you need, measure the width of the pattern piece in your size then x1.5. This is the width of the rectangle you need to cut for each skirt piece (front and back). In the above example, my rectangle for the tier would be 15cm x 95cm.
Patch Pockets
A super easy way to jazz up the simple bodice is to add a patch pocket. You can do this in a matching fabric, but I love the way a contrast fabric also looks for this. You can use up those pretty fat quarters or scraps to add flair to your Indigo.
To do this, make yourself a pattern by drawing half a pocket shape into a folded piece of paper and cutting it out, then cut out two pockets in your chosen fabric. Sew them right sides together leaving a gap in the top straight edge. If you pocket is curved like mine, clip curves, then turn right sides out and press. Stitch along the top to close the gap. To add to your Indigo, simply pin in place and topstitch around the curve to secure. It is easiest to do this whilst the bodice pieces are flat, so try it once you've sewn the bust darts, but before you sew the front to the back.
Cuffed sleeves

Adding cuffs to the sleeves can change the way this garment looks completely. You can do this on either the long or short sleeves as both look cute. To make the cuff, cut two rectangles of fabric, both as wide as the sleeve pattern and twice the depth you want the cuff. Sew the sleeve as normal, then sew the short ends of the cuffs together to make a loop. Sew the cuffs on right sides together, and press towards the inside. Press down 1cm along the top raw edge. Fold in half and topstitch the cuff in place. You can then turn the cuff outwards and fold it up onto the sleeve.
Make it in jersey

For the ultimate in secret pyjama chic, why not make yourself an Indigo in a stretch fabric? There are a few more steps to this, and its easier if you have some experience making jersey garments before you give this a go.
To start, you'll need to eliminate the darts from the front bodice. Do this by pinching the dart out of the pattern piece before you lay it onto your fabric. It won't lie completely flat, but pin it down as best you can and cut out the rest as normal. You won't need to cut the facing pieces and instead cut a neckband. This should be the circumference for the neckline -4cm. Measure the neckline of the front and pack pattern pieces, and double each one. This is the neckline circumference. Cut out a rectangle this long - 4cm and 4-5cm wide.
To attach the neckband, you can follow the instructions for another jersey top, but here it is in simple terms:
Sew the short edges of the neckband together
Fold in half lengthways, matching the raw edges and press
Pin the neckband onto the neckline having the seam at centre back and the middle point of the neckband at centre front.
Stretch the neckband slightly to fit the neckline as you pin in place to prevent gaping.
Stitch the neckband in place and press the seam down.
If the neckband seems to big for the neckline, sew the neckband seam allowance a bit bigger to shorten the neckband. Then sew the rest of the Indigo as normal.
Add waist ties
Love the idea of Indigo but not convinced by its loose fit? A simple addition to solve this problem is to add waist ties. To do this, cut out two long, narrow rectangles of fabric, approximately 55cm x 4cm. Sew along the long edge and one short edge, in an L shape, and turn the tie the right way out using whatever poking method you usually use! Stitch these right sides together to the back bodice piece at the side seams, 5/8"/1.5cm above the bodice raw edge so they don't get caught in the waist seam, then sew your front and back bodice pieces together. Make sure that you pin them out of the way, to avoid them getting caught in any seams. Once the dress is finished, you can tie the ties at the back to bring the dress in at the waist.
We've yet to use this hack ourselves, but these pics from the lovely Rebecca, @redsews on Instagram, show you the difference they make. We give her full credit for this little hack too!
Button Back

Here is the real reason you all came here, how to turn Indigo into a button back top. We love this little touch and you can add some colour or sparkle to your indigo.
The hack starts at the cutting phase. When laying out your pattern pieces, don't place the back bodice on the fold. Instead, cut out a pair, adding two inches to the centre back line (the line you would usually place on the fold) to create a placket. You will also need to do this with the back skirt piece and back facing piece. Next cut out two two inch wide strips of interfacing too, the length of the back bodice.
Here, we've cut out the back pieces on the selvedge to make it a bit easier.

If you don't want the buttons to go all the way down the back, you only need to cut the back bodice out with the extra allowance. If you are not adding buttons to the skirt part, then you may find it helps to tack the back bodices together to keep them in place, whilst you add the gathered skirt.


Sew the shoulder seams on the bodice and facing as normal, but don't attach the facing yet. Sew up the side seam on the bodice and skirt pieces, then gather and attach them as per the pattern instructions. Once your Indigo looks like an apron, you can interface and finish the back opening seam.

Put your garment face down and line up the shoulder seams to see how far the back bodice sections overlap (see photo 1 below). Fold the back opening over by about 3/4" so that the two pieces still overlap.
Pin this in place all the way down and stitch to secure, creating your button band. Now its time to attach the facing. Pin in place all of the way around the neckline, matching notices and seams. The facing will extend past the back opening. Sew this in place. Trim the facing down so it extends about ½" past the back opening, then fold in the loose short edge and clip the curves.


Now you need to pin and sew the facing in place. This should give you a neat finish at the back edges. If you don't want visible topstitching on your facing, you can just anchor it at the back and shoulder seams or slipstitch by hand, as per the Indigo instructions. Next add the sleeves as per the pattern instructions, however we added the cuff hack to this version for extra sass.
Make sure that the back neck and waist seam line up then mark and pin the hem. You want all of the points to match before you sew the buttons and buttonholes. Once you've hemmed your Indigo, mark your button placement. We used this Simflex sewing gauge which is a great tool we talked about in our 'Set up to Sew' blog post. If you don't have one of these, just measure out your button spacing. Remember, to avoid gaping, you want to add one button at the very top near the neckline and one button just below the waist seam (if you are adding buttons to the skirt).

Sew your buttonholes on your machine, and open them up. Use the holes to mark the button placement on the opposite placket. Remember your buttons need to go on the right side of the garment so that the back bodices overlap to fasten. What about choosing some fun buttons like the strawberry ones we went for? We think it gives this gingham top ultimate summer picnic vibes. You can also choose something a little more chic if you prefer.

Once your buttons are on, fasten it up and TA-DA! You won't really have to undo the buttons as Indigo is designed to be slipped over your head, so you could even cheat (shhh!) and omit the buttonholes altogether and just sew the buttons through both packets if you prefer. Here are some pictures of Alex wearing her picnic-blanket inspired Indigo with some fabric inspo to get the creative juices flowing.
L-R: Nautical Ponte Roma; Navy Polka Dot Morrocaine Crepe; Yarn Dyed Blush Cotton Chambray; Painted Ladies Printed Viscose; Emerald Floral Print Viscose; Cotton Seersucker - Cerise Check

Stay safe and happy sewing!


Comments